
October 9, 2025
Google Tag Manager Form Tracking with GA4: 7 methods
Updated: October 9th, 2025
Tracking form submissions in Google Analytics 4 is a common challenge because there are many different types of web forms. The best method depends on how your form is built. Some redirect to a “thank you” page, while others show a success message without a page reload.
The key to success is to correctly identify how your form behaves and then choose the right trigger in Google Tag Manager. In this blog post, I’ll show you 7 Google Tag Manager form tracking techniques, from simple pageview tracking to more advanced methods.
Table of contents
-Here’s what you will learn in this article –
- If this blog post looks complex to you
- Basic Context
- Tag + Trigger
- Before We Continue: Ready-made Guides
- Which Form Tracking Method Should You Choose?
- Method #1. Google Tag Manager Form Submission Trigger
- Method #2. “Thank you” Page Tracking with Google Tag Manager
- Method #3. Track AJAX Form Submissions with Google Tag Manager
- Method #4. Track Form Submissions with Element Visibility Trigger
- Method #5. Write Your Own Form Auto-Event Listener
- Method #6. Form Tracking with dataLayer Events
- Method #7. Track Form Submissions with DOM Scraping
- Final words
If this blog post looks complex to you
This article is a long one, and some parts might be confusing, especially if you are starting with Google Tag Manager. If you want a fast solution, I have a module in my GTM course for beginners dedicated solely to form tracking. You can learn more about the course here.
Google Tag Manager Form Tracking: Basic Context
In this wonderful thing called THE INTERNET, there are various form types. Some refresh after a successful submission, some don’t, some might redirect you to a “thank you” page, etc. The main problem with form tracking is that there are no global standards for how forms must be developed. Some developers may prefer one technology (e.g., AJAX) over another – and they have a full right to do so.
Since you are interested in form tracking, you have probably noticed the Form Submission trigger and built-in Form variables in Google Tag Manager. Have at least one Form Submission trigger active on a page (which listens to all form submissions), and you’ll turn on the Google Tag Manager Form auto-event listener.

Form auto-event listener listens for a standard submit browser event. However, most forms use other ways to send their data (e.g., jQuery’s $.ajax); thus, the submit event is prevented from working. In that case, Google Tag Manager never records a form submission. And that’s a pretty common problem (in fact, I’d say that in 99% of cases where I worked, I used a different tracking method).
If GTM’s form listener does not work in your situation, other alternatives exist for reaching the goal. This blog post will explain standard options and workarounds for Google Tag Manager form tracking.
A Rule of Thumb: Always Test for Failed Submissions
A painful mistake in form tracking is to only test for a successful submission. A poorly configured trigger can fire even when a user submits a form with empty required fields. This leads to inflated conversion numbers and inaccurate reports.
For every method in this guide, your testing process must include two steps:
- Test a successful submission: Fill out the form correctly and confirm your tag fires as expected.
- Test a failed submission: Intentionally leave a required field blank and submit the form. Confirm that your tag does not fire.
If a tag fires on an error, your trigger is too broad, and you need to choose a more specific method from this guide (or maybe to make your trigger more accurate).
Tag + Trigger
You are probably already familiar with the main Google Tag Manager concept: every interaction you want to track needs a tag and a trigger. If you want to track all form submissions with Google Analytics 4, you must create a Google Analytics Tag and a Trigger (rule) when a tag must fire.
Creating a tag is the easy part of this process. Let’s make one – you’ll need it in the upcoming chapters of this blog post.
In this article, I presume you have already installed Google Analytics 4. This means your container contains the Google tag and the Constant variable (with your GA4 measurement ID). If not, read this blog post first.
After you have a Google tag and a Constant Variable in your GTM container, it’s time to create a GA4 event tag that will be used in all of the examples of this article.
- Go to Tags
- Press New button
- In Tag Configuration choose Google Analytics > Google Analytics: GA4 Event
- In the Measurement ID section, insert your constant variable (with Measurement ID). That way, the event tag that we are creating will reuse some of the settings from the Google tag.
- In the Event Name field, I enter generate_lead
- Leave the Triggering part empty (for now) and click Save. We’ll get back to it later. 80% of this blog post is dedicated to various types of triggers you can make use of. The choice of trigger type depends on the way a form was developed.

Let me quickly explain some of the choices. I used generate_lead as an event name because it is in the list of GA4 Recommended events. But if you want, you can name it something else.
Also, in the upcoming chapters of this blog post, I might suggest adding some additional parameters to this tag, so keep an eye on that.
======
Every form tracking method that I am going to cover depends on different elements/events that occur on a website after the form submission:
- Form auto-event listener
- Thank you page
- AJAX form tracking
- Tracking with Element Visibility trigger
- Writing your own form auto-event listener
- Developer’s help (to ask for the dataLayer.push)
- DOM scraping
An incorrectly configured trigger will result in false data and reports (leading to wrong insights and actions). So read everything carefully.
Before We Continue: Ready-made Guides
Now, before we dive deep into this guide, there’s something you should know. This entire guide is universal and covers probably around 95% of form-tracking cases that I have/had to deal with.
However, to save you some time, I’d like to ask this: are you using Contact Form 7, Caldera Forms, or Gravity Forms plugins?
If yes, then I have some good news for you. Here are three guides tailored to those popular form plugins:
- How to track Contact Form 7 with Google Tag Manager
- How to track Gravity Forms with Google Tag Manager
- How to track Klaviyo forms with GTM
- How to track ConvertKit forms with GTM
- How to track Paperform with GTM
- How to track Typeform with Google Tag Manager
If your form is custom or built using another technology, don’t worry. I have covered all the tips in the next chapters.
Which Form Tracking Method Should You Choose?
Before diving into the pool of triggers and tracking techniques, we’ll need to inspect a form and decide which technique fits our needs the best. I have prepared a flow scheme to help you choose the right Google Tag Manager form tracking method. ![]()
![]()
Open full scheme in a new window
Here’s a quick summary of the seven methods to help you find the right one faster.
| If your form… | The Best Method to Use Is… |
Why It Works |
| Redirects to a unique “/thank-you” page after submission. | #2: “Thank You” Page Tracking | This is the simplest and most reliable method when available. It tracks a pageview on the confirmation page. |
| Shows a success message without reloading the page. | #4: Element Visibility Trigger | This GTM trigger can detect when the “Thank you for subscribing!” message appears on the screen. |
| Works with GTM’s built-in “Form Submit” event in Preview mode. | #1: GTM Form Submission Trigger | This uses GTM’s native form listener but might fail with modern forms. Always test it first. |
| Shows an “ajaxComplete” event in GTM Preview mode after submission. | #3: AJAX Form Tracking | This requires a custom listener to capture data from forms that submit in the background without a page reload. |
| Is supported by a developer who can modify the site’s code. | #6: dataLayer Events | This is the most robust. A developer sends a custom event directly to GTM’s dataLayer. |
| Has no other reliable success signal, but a visible message appears. | #7: DOM Scraping | A last-resort method that scrapes the success message text from the page. It’s fragile and can break easily. |
I am sure that some parts of that scheme might look vague. Continue reading, and everything will become much clearer.

Method #1. Google Tag Manager Form Submission Trigger
First, let’s try GTM’s built-in form listener. Open a list of Variables in your Google Tag Manager account. By default, form variables are disabled. Therefore, you need to enable them. Under built-in variables, click Configure, and in the right sidebar enable all Form variables (all changes are automatically saved).

Then, open a list of all your triggers (by clicking Triggers in the left sidebar of the GTM interface). Create a new trigger with the following settings:

A little about the Check validation checkbox. Once this is checked, Google Tag Manager will not activate the Trigger if the default action of the form (submit and redirect) is prevented.
If left unchecked, the trigger will go off whenever a submit event is registered (even when a form is submitted with errors (e.g., several required fields are left blank)).
When that checkbox is enabled, an additional field “Enable this trigger when…” appears. In my case, I want this trigger to be active on all pages. That’s why I entered Page Path contains /. Why? Because Page Path will always contain at least one slash on any page.
Now, let’s use GTM’s Preview and Debug mode to find out whether the default form auto-event listener works for us. At the top-right corner of your Google Tag Manager account, click Preview.

Then, a new browser tab will open, asking you to enter the URL of the page where the form is located. Enter it and click Start.

After that, a new tab (or window) will open with your website. At the bottom of the screen, you should see a badge similar to this one (that says connected):

If the preview mode’s tab or the badge has not connected, read this guide on how to fix Google Tag Manager Preview and Debug mode.
After Preview and Debug mode is enabled, navigate to the site where the form is located. Fill in the form (try not to leave any fields blank):
- Hit the submit button. Did a Form Submit event appear in the Preview and Debug console? If not, then GTM’s Form auto-event listener will not work with this form, and you should skip to the next form tracking option described in this blog post.


- If the Form Submit event did appear in Preview and Debug console, then you should do another test – try leaving at least one required form field empty and submit the form again. This way, you’ll imitate an error in your form:
- If the Form Submit event is fired once again, then you should check other form tracking options mentioned in this blog post.
- If the Form Submit event did not fire – that’s great! It means that GTM will track only those form submissions that were successfully completed (and this is exactly what you need).
If you read this paragraph, I’ll presume that the Form Submission trigger works as expected and fires the event in the preview mode ONLY when a form is submitted successfully.
Let’s create a trigger specifically for that form. Remember the Form Submit event that was previously mentioned? Click on it (in Preview and Debug mode), then click Variables.

Then scroll down and start looking for any Form variable that is unique for that form. Usually, it will be Form ID variable, on other occasions – Form Classes (but Form ID is a better option). As you can see in the image below, I have submitted a form (of which Form ID variable is wpdevart-forms-7).

This is a good identifier that is not used on any other elements in the website, so I’ll use it for my trigger:
- Go to Triggers and open that Form Submission trigger that you have previously created
- Instead of “All Forms”, select “Some Forms” and enter the condition to target only that particular form. In my case, that is Form ID equals wpdevarp-forms-7.
- If you don’t see the Form ID variable – Enable it in the list of Built-in variables of Google Tag Manager.
- Form ID may (and probably will) be different in your situation (compared to my example).


Save the trigger.
If you have more than one form that visitors/users can submit, it might make sense to include an additional parameter in your GA4 event tag (that will help you distinguish which form was submitted).
In GTM, go to Tags and edit the GA4 event tag you created.
There is no strict requirement of how that parameter should be named, so I’ll name it form_id. And its value will be the value of the {{Form ID}} variable.

Save the tag.
Let’s Test + Register Custom Dimension in GA4
- Assign this new trigger to the Google Analytics 4 Event Tag that you created at the beginning of this blog post.
- Refresh a Preview and Debug mode (by clicking the Preview button in the GTM interface once again)
- Then fill in the form and submit it. If Google Analytics Tag fired, that’s good news! Also (if possible), try submitting a different form on your website: in case of a successful submission, a GA tag should not fire.
- You should also check the incoming events in Google Analytics 4 Debug View.
- If you plan to use the form_id (or some other custom parameter in GA4 reports), you have to register it as a custom dimension. Read this guide to learn more.

Method #2. “Thank you” Page Tracking with Google Tag Manager
If the standard form listener in Google Tag Manager does not work, you should check whether that form redirects a user after a successful submission to another page.
- If yes, what URL (web address) does it redirect to?


- Is that address unique?
- If yes, can users just navigate to that page without actually submitting a form? If the answer to the last question is no, then you can create a pageview trigger that fires only on that success page. Your goal here is to avoid accidental visits to success (a.k.a. “Thank you” page) as much as possible.
Now, let’s create a trigger that fires only on the “Thank You” page.
- Go to Triggers in Google Tag Manager
- Press New button
- Choose trigger type – Pageview and Some page views
- If the visitor is redirected to https://www.example.com/form/thankyou.html, then you can set one of the following rules for this trigger:
- Page Path equals /form/thankyou.html.
- or Page URL contains /form/thankyou.html. Try being as specific as possible. Setting just “thankyou” as a rule for this trigger might not be the best idea because there might be other pages, of which URLs can contain that word (and we don’t want that!).
- Do not forget to properly name the trigger, e.g., “Pageview – Successful Form Submission”. A title must be clear. Otherwise, you’ll have a mess in your Google Tag Manager account (in the long run). You can read more about naming tips (a.k.a. Naming Conventions) here.

Let’s Test + Dimensions in GA4
- Assign this new trigger to the GA4 event tag that you created at the beginning of this blog post.
- Open (or refresh) a Preview and Debug mode, and refresh a web page with a form you want to track.
- Then fill in the form and submit it. After successful submission, you’ll be redirected to a “Thank you” page – if Google Analytics Tag fired, good job! Also (if possible), try submitting a different form on your website (to see if the tag did not fire on accident).
- You should also check Google Analytics 4 Debug View.
- If you have multiple forms and all of them have different thank you pages, you don’t need to set any custom parameters to the GA4 event tag. GA4 already automatically tracks page_location, and you can distinguish form submissions with a dimension such as Page Path.
- If, on the other hand, you have multiple forms and one “Thank you” page, you will need to do this:
- Check all of these tips and see if you can get a variable that contains some form identifier (e.g., form id, form name, etc.) and use it in the next list item.
- Then, include an additional parameter in the GA4 generate_lead event tag. It can be something like form_id, form_name, or whatever works for you, for example:


Method #3. Track AJAX Form Submissions with Google Tag Manager
If you are reading this part, your form is probably not sending valid form submit events and is not redirecting users to a “thank you” page. It probably just refreshes itself and then displays the “You have successfully filled in the form” message without the actual page refresh.
This AJAX method is very common on websites because it feels fast and seamless to the user. Instead of reloading the entire page just to show a “thank you” message, the form quickly submits the data in the background and updates a small part of the page. While this is great for user experience, it makes our job a bit trickier because the standard GTM form trigger is not alerted. That is why we need a special “listener” to watch for these background submissions.
There’s a big chance that this form is using AJAX. I suggest skipping all the technical details here. The only thing you should know here is the AJAX listener.
Bounteous have shared an awesome AJAX listener for GTM that everyone can use for free. Here, we’ll borrow their code to track form submissions. Copy the code below and paste it in the Custom HTML tag on Google Tag Manager:
<script id="gtm-jq-ajax-listen" type="text/javascript">
 (function() {

 'use strict';
 var $;
 var n = 0;
 init();

 function init(n) {

 // Ensure jQuery is available before anything
 if (typeof jQuery !== 'undefined') {

 // Define our $ shortcut locally
 $ = jQuery;
 bindToAjax();

 // Check for up to 10 seconds
 } else if (n < 20) {

 n++;
 setTimeout(init, 500);

 }

 }

 function bindToAjax() {

 $(document).bind('ajaxComplete', function(evt, jqXhr, opts) {

 // Create a fake a element for magically simple URL parsing
 var fullUrl = document.createElement('a');
 fullUrl.href = opts.url;

 // IE9+ strips the leading slash from a.pathname because who wants to get home on time Friday anyways
 var pathname = fullUrl.pathname[0] === '/' ? fullUrl.pathname : '/' + fullUrl.pathname;
 // Manually remove the leading question mark, if there is one
 var queryString = fullUrl.search[0] === '?' ? fullUrl.search.slice(1) : fullUrl.search;
 // Turn our params and headers into objects for easier reference
 var queryParameters = objMap(queryString, '&', '=', true);
 var headers = objMap(jqXhr.getAllResponseHeaders(), '\n', ':');

 // Blindly push to the dataLayer because this fires within GTM
 dataLayer.push({
 'event': 'ajaxComplete',
 'attributes': {
 // Return empty strings to prevent accidental inheritance of old data
 'type': opts.type || '',
 'url': fullUrl.href || '',
 'queryParameters': queryParameters,
 'pathname': pathname || '',
 'hostname': fullUrl.hostname || '',
 'protocol': fullUrl.protocol || '',
 'fragment': fullUrl.hash || '',
 'statusCode': jqXhr.status || '',
 'statusText': jqXhr.statusText || '',
 'headers': headers,
 'timestamp': evt.timeStamp || '',
 'contentType': opts.contentType || '',
 // Defer to jQuery's handling of the response
 'response': (jqXhr.responseJSON || jqXhr.responseXML || jqXhr.responseText || '')
 }
 });

 });

 }

 function objMap(data, delim, spl, decode) {

 var obj = {};

 // If one of our parameters is missing, return an empty object
 if (!data || !delim || !spl) {

 return {};

 }

 var arr = data.split(delim);
 var i;

 if (arr) {

 for (i = 0; i < arr.length; i++) {

 // If the decode flag is present, URL decode the set
 var item = decode ? decodeURIComponent(arr[i]) : arr[i];
 var pair = item.split(spl);

 var key = trim_(pair[0]);
 var value = trim_(pair[1]);

 if (key && value) {

 obj[key] = value;

 }

 }

 }

 return obj;

 }

 // Basic .trim() polyfill
 function trim_(str) {

 if (str) {

 return str.replace(/^[\s\uFEFF\xA0]+|[\s\uFEFF\xA0]+$/g, '');

 }

 }


 })();
 /*
 * v0.1.0
 * Created by the Google Analytics consultants at http://www.lunametrics.com
 * Written by @notdanwilkerson
 * Documentation: http://www.lunametrics.com/blog/2015/08/27/ajax-event-listener-google-tag-manager/
 * Licensed under the Creative Commons 4.0 Attribution Public License
 */
</script>
Set that Custom HTML tag to fire on all pages.

Now, let’s check whether a form is built on AJAX:
- Enable (or refresh) Preview and Debug mode.
- Try submitting the form on your website (with no errors).
- Did the ajaxComplete event appear in the Preview and Debug console?
- If yes, the form uses AJAX.
- If not, skip to the next chapter of this blog post.
If your answer to the previous questions was Yes, let’s take a look at what we can do with that AJAX form. Click ajaxComplete event in Preview and Debug mode, then expand the API call:

Looks difficult for a non-developer, right? But it’s easier than you think.
This data was passed to the data layer after the successful submission of the form. Each line is a separate dataLayer data point that can be used as a dataLayer variable in GTM.
Now, you should look for something that helps identify successful form submissions. Scroll down and look for “response”.

Let’s take a closer look at it. Can you see the message “Thanks for contacting us! We will be in touch with you shortly”? Bingo! We can use it as a trigger.
First, let’s create a Data Layer variable in Google Tag Manager.
- Go to Variables
- Scroll down to User-Defined variables and hit New
- Click Variable configuration and choose variable type – Data Layer Variable
- Enter Data Layer Variable Name – attributes.response.data.message

You’re probably guessing why I entered attributes.response.data.message as Data Layer Variable Name, instead of just response. Let’s look at Data Layer in Preview and Debug mode.
In line 2, you see the event named ajaxComplete – that’s the same name that appears in Preview and Debug console’s left side. Then, we see attributes, which is an object containing various data points (key-value pairs). And the response is one of those keys.
Within that response (2), we see data (3), and within that, we see message (4).

Think of this as accessing folders. First, you have to access the attributes, then you go to response, then you go to the data folder, and then you access the message.
IMPORTANT: In your case, the structure of the data can be different, and parameters can be named differently. It will always start with attributes.response, but after that, things might differ in every form. It might be attributes.response.message or something like that. You will need to adapt.
Another example: let’s say you’re interested in Server data (from that very exact AJAX response). In that case, the Data Layer Variable’s Name should be attributes.headers.Server .
After we create the Data Layer variable in Google Tag Manager, let’s debug. Refresh Preview and Debug mode (by clicking the Preview button in the GTM interface).
Fill in the form and submit it. Click the most recent ajaxComplete event in the Preview and Debug console, then navigate to the Variables tab and find the new variable dlv – attributes.response.data.message. If you did everything correctly, it should look like this:
That’s a message of the successfully submitted form. If the value of that variable is undefined, then you should start looking for mistakes. The most common ones are typos in the variable name or inaccurately defined variable’s path. Some people just try using response instead of attributes.response.data.message.
Now let’s create a trigger that fires when the event is ajaxComplete, AND our new Data Layer variable contains “Thanks for contacting us”.
- Go to Triggers and click New
- Choose Trigger Type – Custom Event
- Enter Event name – ajaxComplete
- This trigger should fire on Some Custom Events.
- Define a condition when the trigger will fire – dlv – attributes.response.data.message contains Thanks for contacting us!

Let’s Test
- Assign this new trigger to the Google Analytics 4 Event Tag that you created at the beginning of this blog post.
- Open (or refresh) a Preview and Debug mode
- Then, fill in the AJAX form and submit it. After successful submission, the Google Analytics 4 Event Tag should fire (it will be displayed in Preview and Debug mode. You should also check Google Analytics 4 Debug View.
Things to keep in mind when tracking AJAX forms:
- The response of your form might look different, so you should adjust your Data Layer Variable and Custom Event trigger.
- If developers change the response’s data, your trigger will fail. Inform developers about your GTM implementation.
- If the page contains more than one AJAX form, try looking for more information in Data Layer, which can help Google Tag Manager tell the difference between those forms.

Method #4. Track Form Submissions with Element Visibility Trigger
One of the most awesome triggers in GTM (in my opinion) is the Element Visibility trigger. It enables you to track when a particular element appears on the screen (due to scrolling or other circumstances).
The same technique can be applied to forms when a message (e.g., “Thank you”) appears after a form is successfully submitted.
If you prefer video content, here’s a tutorial that shows you the exact steps:
The first thing we need to do here is to inspect a form’s success message. We’ll need to find a way to instruct Google Tag Manager which particular website element we are interested in.
After you submit the form successfully, right-click on the success message and choose Inspect Element.

You will then see the browser’s developer tools that contain various information about the message: its content, CSS class, etc.
In the example below, I see that the message has a class “thanks” which could be used as a condition in the Element Visibility trigger. It would be even better if the success message had a parameter called “id,” but since it’s not available, we’ll use CSS class.

Let’s go to your Google Tag Manager container and go to Triggers. Create a new trigger and choose Element Visibility as its type. The key ingredient here is the Selection Method that will help GTM understand what we are looking for.

The selection method has two options: Element ID and CSS Selector. Since the success message in my example has no id (but “class”), we’ll go with CSS Selector.
In the Element Selector field, we need to paste the class “thanks”. In CSS, every class is defined with a dot in front of it, so let’s do the same.
Finally, make sure you tick “Observe DOM changes”. This setting means that if an element appears on the screen not due to scrolling but under some other circumstances (e.g., “just simply pops in”), GTM will catch it (most likely).
Take a look at the screenshot below. If you want, you may do some other tweaks but what I did was a bare minimum.
![]()
![]()
Save the trigger.
If you have no idea what you are doing here with a CSS selector, I explain them in plain English here + I share some tips on how to learn the topic faster.
Let’s Test
- Assign this new trigger to Google Analytics Tag that you created at the beginning of this blog post.
- Open (or refresh) a Preview and Debug mode
- Then fill in the form and submit it. After successful submission, in the P&D console, you will see the Element Visibility event. Click it, and you will see that the GA4 tag has fired. If you don’t see the Element Visibility event, you probably made some mistake in the Selection method or CSS selector field. Or forgot to enable Observe DOM changes checkbox. Or that form is in the iFrame (in that case, my Intermediate/Advanced GTM course will help you solve the problem).
Method #5. Write Your Own Form Auto-Event Listener
Yes, I know that this sounds complicated. This can’t be further from the truth.
If no other tracking method (explained in this blog post) works, you have nothing to lose. Where am I going with this?
There is a slight chance you can write an auto-event listener independently (without solid coding skills). And I have explained that in this blog post.
So before you dive into that article, first answer this question: Are you trying to track some custom-made form built by a developer specifically for your website? If yes, skip to Chapter #6 of this blog post. Otherwise, try this method. It is not directly related to forms but the idea can work and can be applied.
For example, the Gravity form tracking guide is the result of this method.
Method #6. Form Tracking with dataLayer Events
Disclaimer: Although this form tracking method is a robust solution, I placed it as a No.6 option in this list for a reason.
When other marketers approach me for form tracking advice, they’re looking for a solution where the developer’s input can be avoided. “Manage your marketing tags without help from developers” is one of the main reasons why they start considering Google Tag Manager in the first place.
This statement was among GTM’s key “selling” points when it was launched, so it’s no surprise marketers expect this to be 100% true. In reality, the developer’s help is strongly advised in more complex situations.
Before you feel discouraged, remember that involving a developer is not a failure. It is actually the most recommended and reliable way to make sure your tracking is accurate and stable for the long term. While the methods in this guide can get you very far on your own, a custom data layer event is like getting the data straight from the source. It is less likely to break during website updates and gives you the cleanest possible signal that a form was submitted successfully.
My position here:
- If you have access to developers and Google Tag Manager’s Form listener isn’t working for you, I recommend using dataLayer.push method, which I will describe further.
- If you don’t have access to developers or they are super busy (and they usually are), then it’s okay to track with other techniques mentioned in this blog post. Just be aware that other solutions have a bigger chance of breaking when developers constantly update a website. This especially applies to technique No. 7 – DOM scraping.
I hope I have made my point clear and that we can continue.
As mentioned above, if the built-in Google Tag Manager Form listener does not work with your form, the next best thing is to ask the developer to implement a custom dataLayer.push() into the callback function, which is activated upon successful form submission. The piece of code could be something like this (obviously, that dummy data like “Footer” should be replaced with the actual data of your form):
window.dataLayer = window.dataLayer || [];
  window.dataLayer.push({
   'event': 'formSubmission',
   'formType': 'Contact us',
   'formPosition': 'Footer'
});
You’ll need to prepare a short but well-written and clear task for a developer:
- First, choose a name for the event. In the example above, I chose formSubmission.
- Then, think of any additional data you may need. Write those data points down and try categorizing them.
- Let’s say I have several forms – “Contact us” and “Newsletter Subscription”. So I decided to have a dataLayer variable formType.
- Another useful parameter (in my opinion) is form position because some forms are in the footer, and others are in the sidebar of a website. Why not make it another dataLayer variable?
- If a developer is new to dataLayer events and Google Tag Manager in general, hand them a link to this dataLayer.push guide with clear examples. Explain to them that you need an event with additional parameters pushed into dataLayer after the successful form submission. If developers still have questions, this blog post should enlighten them.
- But remember to emphasize that a developer should dynamically replace the values of parameters like formType and formPosition. If the X form was submitted, the data of that X form must be pushed to the Data Layer. Your developer’s job is to know and code a solution that inserts the actual values.
Done! After the developer implements dataLayer.push in all forms, you should test it:
- Open Preview and Debug mode.
- Try submitting the form:
- Leave at least one required field blank. In this case, the dataLayer event must not be pushed.
- Fill in all fields and try submitting again. Did the event appear in Preview and debug console? It should look like this:


- Check whether all data is correctly pushed to the dataLayer. Click the formSubmission event and then the API call in the Preview console. Data should look like this:


Set up variables and triggers in GTM. In my dataLayer.push example, there are two data points I’d like to use as variables – formType and formPosition (I will include them in my GA4 event tag), so I need to include them in Google Tag Manager by creating Data Layer variables.
1st variable:
Title: dlv – formType
Variable type: Data Layer Variable
Data Layer Variable Name: formType
Leave all other settings as they are
2nd variable:
Title: dlv – formPosition
Variable type: Data Layer Variable
Data Layer Variable Name: formPosition
Leave all other settings as they are
Now, let’s create a trigger. Go to Triggers and click New. Enter the following settings:
Trigger Type: Custom event
Event name: formSubmission (it may differ depending on your situation. Just make sure you and your developer are using the same name).
This trigger fires on: All custom events. This means that all formSubmission events will be tracked.
Update the GA4 event tag
Since I have created two Data Layer variables (formType and formPosition), I can use them in my GA4 event tag. As I have said before in this blog post, there are no strict requirements for how those parameters should be named.
I decided to use form_type and form_position. Their values are those two Data Layer Variables I have just created.

Save the tag.
Let’s test + GA4 Custom Dimensions
- Open (or refresh) a Preview and Debug mode
- Then fill in the form and submit it. After successful submission, Google Analytics Tag should fire (it will be displayed in Preview and Debug mode).
- You should also check the incoming events in Google Analytics 4 Debug View.
- Register form_position and form_type as Custom Dimensions in GA4 (if you plan to use them in the reports). Read this guide to learn more.
Method #7. Track Form Submissions with DOM Scraping
This method should never be your first option. Try using all other Google Tag Manager Form tracking methods (described in this blog post) before you continue reading this chapter.
If developers often update the website’s code, you should treat DOM scraping as a last resort. It is risky and can break faster than you think.
Even a slight change committed by the developer might break your implementation. Also, it requires some knowledge of Javascript and DOM concepts (which is not a very common skill among marketers).
For this example, we’ll be using DOM Element Variable. It is a variable in Google Tag Manager that lets you scrape content directly from the Document Object Model (in other words, with its help, you can transfer any text on your website into a Variable and pass it on to your Marketing tools (e.g., Google Analytics)).
As an example, I’ll use a Shopify demo store. There is a Signup up to our mailing list form at the bottom of their homepage.

Enter [email protected] in that Shopify form and hit Subscribe. A page will refresh, the web address will change to https://somewebsite.com/?customer_posted=true#contact_form, and that little form will display a “Thank you” message.

In this case, we could easily track form submissions with the Pageview trigger of the Thank you page, but let’s imagine that the page’s address (URL) did not change. This is not a common situation, but it’s possible. That’s where the DOM Element Variable might come in handy. We could create a trigger that could scan a website and look for a success message “Thanks for subscribing”.
First, let’s create a DOM element variable looking for that particular success message. Hover your mouse cursor over the success message’s text, right-click, and choose Inspect.

A developer’s console will appear with a lot of HTML code. Note that the success message’s code is already selected in that console. That message does not have any unique ID so we’ll need to utilize CSS Selectors.

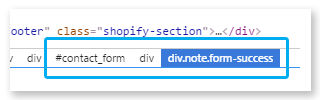
At the bottom of the screenshot, you can see a line of CSS selectors, e.g. div.note.form-success. These selectors can help us identify the exact element of the website.
Let’s create a DOM Element variable and try to scrape the “Thanks for subscribing” text.
- Go to Variables
- Scroll down to user-defined variables and click New
- Choose Variable type – DOM Element Variable
- Selection method – CSS selector
- In the Element selector field enter div.note.form-success


See what I did there? I entered the last CSS selector from the screenshot above. - If there were more than one possible success message on a website with a similar CSS selector, I would have used a longer CSS selector, for example, “#contact_form div div.note.form-success” (without quotation marks). If you want to learn CSS Selectors and how to apply them in GTM, take a look at this course.
- Leave the Attribute name empty.
- The variable’s title could be DOM – Form Success Message.
- Hit Save.
If this section looked complicated (because it is), then you might want to learn more about JavaScript and how to apply it in Google Tag Manager. I have a course about that.
Let’s test
Enable Preview and Debug mode. Submit the form. Choose the DOM Ready (not Container Loaded) event in the Preview and Debug console and click Variables.

If the DOM – Form Success Message variable’s value is Thanks for subscribing, you did a good job.
Alright! We need to create a trigger that depends on our new DOM variable.
- Go to Triggers and click New
- Choose Trigger type – DOM Ready
- This trigger fires on Some Pages
- Enter the following condition: DOM – Form Success Message equals Thanks for subscribing. This means that the trigger will fire only on those pages where the Form success message is displayed to visitors.
- Save the trigger
Do not forget to test:
- Assign this new trigger to the Google Analytics 4 Event Tag you created at the beginning of this blog post.
- Open a Preview and Debug mode (or refresh)
- Fill in the form and submit it. After successful submission, Google Analytics Tag should fire (it will be displayed in Preview and Debug mode).
- You should also check the incoming events in Google Analytics 4 Debug View.
- Also, try submitting a form with an intentional error and see whether the tag fires (it shouldn’t).
Google Tag Manager Form Tracking: Final words
In this blog post, I described a bunch of form-tracking methods with Google Tag Manager. This has been an intense ride, but I hope you found it useful. You should now be able to track many more forms without a developer’s input.
Remember – it’s okay to ask for the developer’s help. If possible, choose dataLayer.push method over DOM scraping. Robust solutions should be your priority.
Did I skip something in this post? Is there some aspect of form tracking that you’d want more information on? Drop me a comment, and let’s see what we can come up with!

52 COMMENTS
Hi Julius
I still can't figure which tech should work for my site as the form is in overlay.
The developer just added : dataLayer.push({'event':'formSubmission','formType':'Registration'});
but I don't have any event in my preview mode gtm.submissionform
thanks for your help
Hey Julien,
If a developer has added that code snippet, you should see "formSubmission" event in the preview mode after the form is successfully submitted. If it does not appear, ask him to add this one:
window.dataLayer = window.dataLayer || []
window.dataLayer.push({‘event’:’formSubmission’,’formType’:’Registration’});
If it still does not appear, then the developer did not properly add the code and you should ask him/her to fix it.
Hello again,
I returned to the same issue with another client already.
I created variable "Form Submission Message" where use ID as selection method and specified element ID. Btw should I put element ID with # or without #? Does it make a difference?
Then by your previous recommendation, I created new trigger the type of Element Visibility, where as selection method specified the ID; "Minimum Percent Visible" = 100%; the condition for trigger fires on "Some Visibility Events" is "Form Submission Message" which is start from "Thank you for contacting us".
But it doesn't work, gtm.elementVisibility doesn't load.
https://versapak-anti-doping.com/contact-us/
What am I doing wrong?
Thank you in advance.
Hey, if you chose selection method: ID, then # is not needed. # is needed if selection method is CSS Selector.
Now, regarding your form. Since you form reloads the page and the success message is displayed on the page right away, I suggest using DOM Scraping method instead of Element Visibility. It's a bit risky, but if no one changes the ID, you should be good. Here's a guide how to track with DOM scraping https://www.analyticsmania.com/form-tracking-dom-scraping-google-tag-manager/
Hi Julius!
I followed #4. Track Forms with Element Visibility Trigger and the tag and trigger is set up fine. gtm.elementVisibility is firing right after DOM Ready, but the Google Analytics Tag fired only once after some delay of scrolling up and down the page (not immediately on the page load) and I couldn't get it to fire again after submitting another form.
Hey, Enable the "Observe DOM changes" checkbox and try again.
I recently had to modify Lunametrics script to work on a single page app.
If anybody is interested then feel free to use it: https://gtm.marxdev.com/.
It works exactly like Lunametrics script but doesn't depend on jQuery and so should work on all websites.
Dear Julius,
thanks for great content that you are sharing on this site and through your courses!
I've implemented successfully a lot of form tracking through element visibility trigger. However I'm struggling with one website. They don't have a permanent element that is visible after submitting the contact form. Just a 2 second pop-up appears at the top of the page, then it disappears. Is it possible to track it somehow?
Here's the guide I've just published. Inspired by your comment.
https://www.analyticsmania.com/post/how-to-pause-javascript-and-inspect-an-element-that-quickly-disappears/
Thanks!
Can you set a visibility trigger with an alert box? The form I'm trying to track only displays it after successful submit ( but I can't find the way to inspect it) I tried right-clicking on it to no avail.
The alert box looks like the one on this page (first alert box):
w3schools.com/js/js_popup.asp
Hey, no. That default browser array is not a part of the DOM (document object model), therefore, element visibility trigger cannot track it. Such form would require developer's input.
As far as I saw on Stackoverflow, it would be possible to try to track the appearance of such alert with some custom JS, but it would not be guaranteed to work properly and also solutions I saw were tested just on Chrome.
All in all, I'd go with developer's help on this one.
I'm also seeing the weird issue with facebook.com/tr/ as the Click URL for a form
Read this https://www.analyticsmania.com/post/why-is-there-a-gtm-formsubmit-event-on-every-page-view/
I used the 2nd method and have the page path as the label so I can see which form was filled out. I have multiple thank you pages for one client and this was super helpful seeing which ones came through and being able to tie them to source. Do you have a reference on how to determine which forms convert more?
You could ask a developer to add ?form-id=xxxx parameter to the thank you page's URL. Instead of XXX, a form ID should be used. Then you could distinguish from which form did a visitor land on a "thank you" page.
Hi Julius, I've recently discovered your web and I found it really useful. I am trying to track form submissions for my website and the auto-event listener method works fine for me except for 1 thing: Although it only fires when the form is valid, when I preview my variables with GTM, all my form variables are undefined, so I cannot make the tag exclusive to that form (if I had another form in the same URL, it would also fire the tag). Maybe you know a fix for this issue? Thanks!
Hi, at your current stage of GTM knowledge, I would contact a developer of that form and ask to add an ID to it.
Greetings! Great to be back on the tutorials - always something to learn! Followed the steps in #2. “Thank you” Page Tracking with Google Tag Manager. Result? Did not work - "Tags Not Fired".Is there a troubleshooting protocol (process?) for finding out what variable is not working properly? Thanbks in advance, Tom
Hi, click on the tag that did not fire on pageview in the preview mode and check the variables.
Hello.
Thank you for the video. I have a question regarding the class. What is the solution if there are more than 1 element (two element) with the same class on the page?
Thank you in advance.
Then you should learn CSS selectors and create advanced solutions.
I went with method 4 i.e. setting up an element visibility trigger
The weird and frustrating problem I am running into is that I have configured the trigger to fire on some visibility events, and specified the conditions (Page Path equals /contact)
Still, in debug and preview mode, the event fires on different pages where there is the same CSS selector.
Even if I put weird conditions like Click ID equals xyz, the trigger fires.
Is this just a debug/preview problem and that the Tag in reality would only be fired on the right page OR am I doing something wrong in the set up.
Sounds like you are doing something wrong. You should learn CSS selectors. My intermediate/advanced gtm course can help with that.
Hi Julius. My contact us form submission google ads and GA4 tags fired successfully by using method 4, and reloading the success page did not recode a second conversion. This is good. However, GTM displays second element visibility and fired tag when I reopen the success page in another window. So I want to know how to avoid duplicate tracking for one submission. Is there any clue?
You would need to go more advanced and store a cookie in the browser to prevent duplicate form submission
Ive had this problem for ages and finally found a solution with you AJAX guide. Great article and support!
The AJAX listener does not work on my website. Do I need JQuery for it to work? Also, there is a form in an iframe from another company that I have no access to. I can pull the selector but it's not doing anything. Is there a way to capture interactions with these types of forms?
Yes, for that listener, jQuery is needed. But there is another comment under this article sharing a solution/listener that uses vanilla JS and does not require jQuery
I am wondering if it is possible to track the number of search inqueries? Is this possible with GTM even tho the form I am speaking about is not a submission form but rather a search engine which shows search results immedately after typing in the search inquery.
Yes, probably https://www.analyticsmania.com/post/track-site-search-with-google-tag-manager-and-google-analytics/
Also, thank you so much for such insightful content! I love it! The explanation is excellent, even not know a lot about Google Tag Manager, I understood how it works :)
Hi Julius,
I was wondering what I should do when the developer has put a data layer push for generate_lead which shows up when the contactform is submitted. The form submission option works as well.
This is what shows up for generate_lead:
dataLayer.push({
event: "generate_lead",
eventModel: {
event_category: "normal",
event_action: "Submitted",
event_label: "Page Name: CONTACT; Form Name: Contact"
},
gtm.uniqueEventId: 33
})
For Form Submit the form id shows up as well in the variables.
This is not a dataLayer.push. This means that developer is sending data directly to GA4 by using GA's native tracking code - GTAG (a.k.a. Google Tag)
We use Pardot (Salesforce Marketing Cloud) forms on our website. Does anyone have advice re: which Tracking Method we should use?
Hi, try all of them. See which one works.
Hi Julius,
We have implemented Option 6, the datalayer.push method, but we still see it fire when trying to submit the form with field errors. Any ideas on how to make sure it only fires on a valid form submission?
Your developer must make sure this works properly. Because right now, it sounds like he/she did not do the job well.
Hi Julius.
Love your detailed posts on using GA4 and GTM.
1. I track form submissions on different pages using Method #4. Track Form Submissions with Element Visibility Trigger. So far this was working fine. But something changed in March 2024 and now GA4 is counting this event multiple times - once when visitor begins to interact with the form and the next time when they submit. This could even be more than twice! I am struggling with this!
2. I tried using 'form_submit' as trigger since it is now a default event and working great! BUT I am unable to use that event to track form submissions page wise.
Hello Julius, Thank you for this amazing article. What should I do if I have multiple forms on the website, all displaying the thank you message on the same page without redirecting to a new thank you page. Should I use Ajax listener or Element visibility method? And if I track it using ajaxlistener method, will I be able to track different forms separately? If yes, please let me know how. Thank you!
Hi, it depends on how the form works. You can take a look here, too https://www.analyticsmania.com/post/track-many-forms-with-one-thank-you-page-with-google-tag-manager/
Hi Julius,
Have you any idea how to collect any information about the form input. It seems te be reset at the time of submission and things like emailadresses are important for enhanced conversions in Google Ads or Advanced matching in Meta
Hi, do you have an article about how to trigger webhooks when tracking form submissions with Google Tag Manager? Many thanks
Hi, no
Hi, would you have advice for me on how I can do this in Google Tag Manager? - trigger webhooks when tracking form submissions?
Many thanks
Hey Julius, I've been tracking forms using the Ajax method highlighted in this blog post: https://www.analyticsmania.com/google-tag-manager-ajax-form-tracking/
The ajaxcomplete event fires twice. Is there anyway to solve this? Thanks
Set the tag to fire once per page. This option is located in the tag firing options.
Hi, i want to track a popup no paper form (meritto) i have tried css selector and ajax listner every thing but none is working. i don't want thank you page as coversion as my teams check thank you page it is counting as conversion in google ads how to fix that ?
Hi. I’m a bit confused for creating the events. There is a way to create events in Google Analytics 4. Is it different than what you are describing in this article? I just want to track form submission on the contact page. Thanks!
Excelente conteúdo. Sempre retorno aqui pra verificar atualizações
Hi Julius,
I might've stumbled across another method.
Had some trouble getting triggers to fire with the methods mentioned with Shopify's form.
According to chatgpt, it's caused by GTM not being able to see shopify embed/ shadow DOMs.
Solved it by adding a new custom HTML tag and custom event trigger.
Let me know if this understanding is correct? Thank you in advance.
<script>
const checkSuccess = setInterval(() => {
const shadowRoot = document
.querySelector('shopify-forms-embed')
?.shadowRoot;
const successMsg = shadowRoot?.querySelector('section[aria-label="//success_message_here//"]');
if (successMsg) {
window.dataLayer.push({ event: 'form_success_visible' });
clearInterval(checkSuccess);
}
}, 500);
</script>
Hi, first off, thank you for this great article! Re: method #3, wouldn't firing the trigger on attributes.statusCode=200 be a better approach? That way you wouldn't be tied to the content of the success message, which could change at some point. Just a thought.
Not necessarily. statusCode=200 can also be present if a form contains an error.